How to Sell Photos on Dreamstime
77
So, you’ve registered as a contributor on the Dreamstime website. What’s next? Next, you need to start the actual process of working on DT (Dreamstime).
This involves learning how to upload your photos and illustrations to the photobank, correctly describe (attribute) them, choose the right category for your works, navigate your Dreamstime account menu, and ultimately, once you’ve earned the minimum withdrawal amount, withdraw your earnings.
Uploading Your Images to Dreamstime
To upload the necessary images intended for selling through Dreamstime, you first need to log into your account and then go to the Contributors area tab and select the Upload files option.
Previously, the “Contributors area” tab was labeled “Photographers area”, but it was recently renamed to accommodate both photographers and illustrators. Since on DT, both photographers and illustrators sell their work.
For your information, the Designers area is intended for users looking to purchase illustrations and photographs from the DT website. On Dreamstime, similar to Fotolia, you can both sell your own photos and illustrations(earn money with photography) and purchase others’ using a single account.

So, after going to the Upload files area, we are automatically taken to another tab Submit Commercial RF Image.
Alternatively, you can access this tab by first going to the Management Area and then clicking on Upload Images.
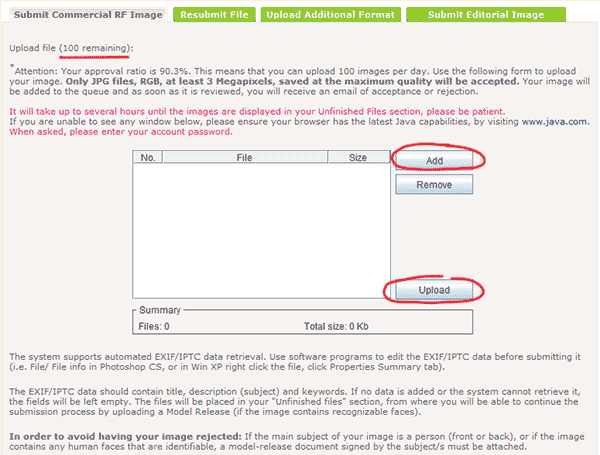
The number of files you can upload to Microstock Dreamstime in a day directly depends on your acceptance rating (in the image, it is 90.3%). In the screenshot, you can see that with such a rating, you can upload 100 files to photo stock Dreamstime in one day.
In this form, you can select the files you intend to upload to Dreamstime by clicking the Add button. After you finish selecting the files and they appear in the table, click the Upload button for their subsequent upload to Dreamstime Microstock agency.
Make sure you upload photos or raster illustrations in JPG format with a minimum resolution of 3 megapixels, saved at maximum quality in RGB mode, before uploading to Dreamstime.
Remember! When uploading vectors to Dreamstime, include a preview of your vector – a raster copy in JPG format with a minimum resolution of 3 megapixels.
After clicking the Upload button to upload the files you have selected, another window will pop up asking you to enter your password. Don’t worry. You just need to enter your Dreamstime account password here.
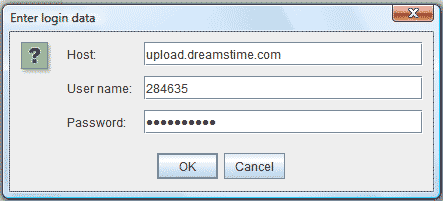
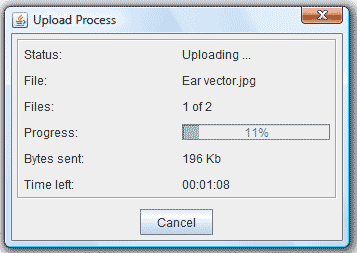
A loading window will then appear. Wait for the message indicating that the upload is complete.
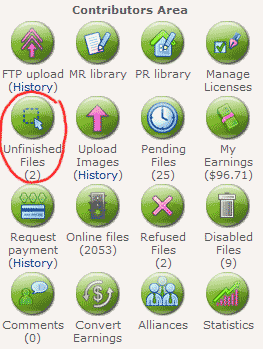
Once you’ve been notified that your files have been successfully uploaded to Dreamstime, return to your account’s Management Area and click on the Unfinished Files button (see the image below).
The files you uploaded in this section will not be displayed immediately; it is quite possible that they may not appear even several hours after uploading.
Attributing the uploaded images
On the next page, if everything has been uploaded correctly, you should see the works you uploaded to the photo stock site. There are three options for attribution available:
- Commercial RF – click here to attribute files for the photo bank database.
- RF (no keywords) – if you cannot keyword your works yourself, you will be offered to do this with the help of the Dreamstime for 40 cents.
- Editorial – for sending files to the section for editorial use (news-oriented).
You should choose the first option COMMERCIAL RF to start attributing the uploaded images.

A page will appear with the image to be attributed, see the image below:
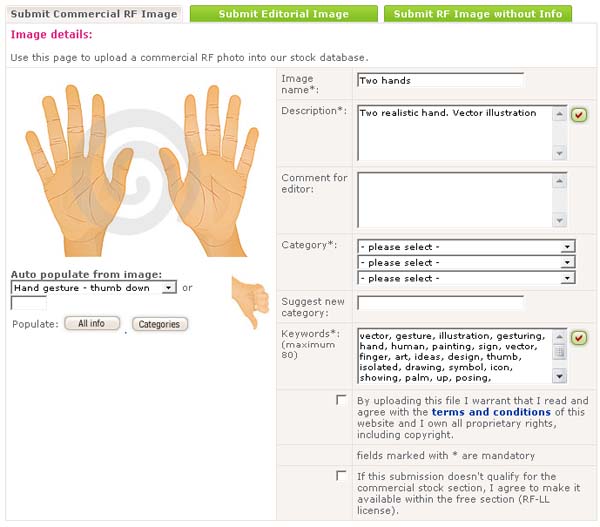
Now you need to fill in the fields (marked with an asterisk – mandatory to fill):
- Image name – name of the work
- Description – description of the image
- Comment for editor – comments for the reviewer, can be left blank
- Category – here you can choose from the list of categories to which you would like to assign your image. You can choose only one category, but it’s better to select up to three categories if possible. I think you won’t have any difficulties understanding the translation of categories.
- Suggest new category – here you can suggest a new category if all the existing categories on Dreamstime do not suit you (although that’s somewhat improper). However, even if you indicate your category in this field, you will still need to specify at least one category in the previous field.
- Keywords – here you should write the keywords that characterize your photo or illustration. Think about what queries you believe should lead to your image being displayed to buyers.
Be sure not to include the word “vector” in the keyword list for vector illustrations immediately after uploading. Add this word only after the vector file itself has been accepted.
The explanation for this is quite simple – after acceptance, your image is only displayed in raster format, while the vector format undergoes a longer verification period (7-10 days). As a result, this can confuse potential buyers, as they search for vectors, and find them, but can only buy the raster.
Also, when attributing an image similar to one you have done before, you can significantly speed up the process, for example, by automatically populating categories the same way as for the previous work. To do this, you need to select the previously attributed image from the list under the large preview by choosing Auto populate from image.
You can click the All Info button to insert all the information from it or click the Categories button to insert only the categories.
Remember to check the box next to By uploading this file I warrant that I read and agree with the terms and conditions of this website and I own all proprietary rights, including copyright to confirm your familiarity with and agreement to the terms of Dreamstime.
The checkbox If this submission doesn’t qualify for the commercial stock section, I agree to make it available within the free section (RF-LL license) can be checked or left unchecked at your discretion. Checking this box means that if your image is rejected by Dreamstime’s inspectors, it will be available for free download.
Uploading model release document
Additionally, if your work requires a model release (permission from the model for using them in your work), it can be done in the section located just below-called Model / property release document.
By clicking on Click here to access the library for uploading a new MR document, you can upload the release, and if this model has already been uploaded to Dreamstime, you can simply select their release from the Model release library.
The last section on this page is titled Rights Management Area.

If you check the box next to I upload this image exclusively on Dreamstime.com, it will indicate that you intend to sell this image only on Dreamstime.com. All other checkboxes listed below need to be filled out. The last checkbox can be checked at your discretion.
- Unlimited Seats (U-EL)
- Increase Max. Copies (I-EL)
- Web Usage (W-EL)
- Print Usage (P-EL)
The checkbox Sell the rights indicates that you agree to sell the full rights to this image; you can also specify a price for acquiring full rights there. But just remember that if the image with full rights is sold, you will need to remove it from all other stock sites within a few days.
That’s all. Click on Submit to send your work for review by the Dreamstime inspector.
Checking images with Dreamstime Inspector
On the next page, the Current pending time line displays the estimated time required for the image to be reviewed by Dreamstime inspectors.

Please note that if you upload a photo or raster illustration, the uploading process to Dreamstime will be completed. However, if you uploaded a preview for a vector illustration, you will need to click the link Should you have an additional format (vector, RAW) to upload for this file, you can continue here to add a vector file as well.
If necessary, you can also add a RAW file for the photographed image since some buyers prefer to process RAW files themselves.
In general, after clicking the aforementioned link, a page titled Upload Additional Format will appear, where you click the Browse button and choose the path to the vector format file, for example, EPS, AI, or CDR. By the way, Dreamstime is probably the most accommodating stock agency when it comes to vector file formats.
So on Dreamstime microstock, you have the opportunity to upload, for instance, a vector file in the latest version of Illustrator with all sorts of effects.

File checks for vector formats at Dreamstime are quite clever. Initially, a check is done on the raster copy, after which it goes up for sale, and only after some time, the vector file is reviewed. So it is quite possible that by the time the vector file is checked, its raster copy may have already been sold multiple times.
If you accidentally did not upload the vector file right away, you can do so later without any problems. If by that time the work is already under review, you will need to go to the Management Area, click on the Pending Files button, select Edit to modify the work, and upload the vector in the required field.
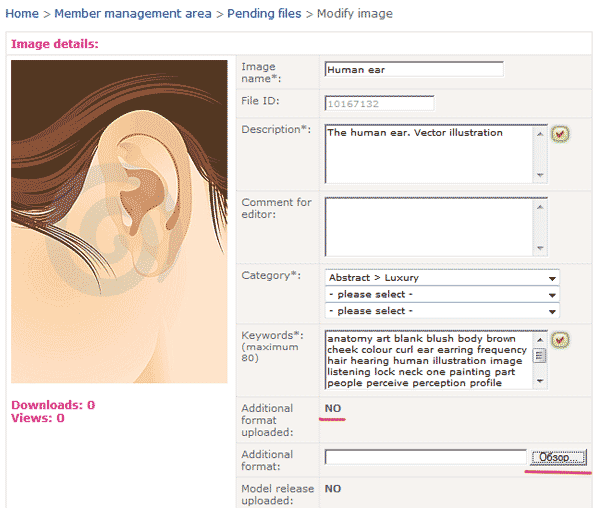
By the way, to check whether a vector file is associated with the image, you can only open that image. If it is uploaded, the field Additional format uploaded will show “YES, Encapsulated PostScript”.
You will be able to see your files that are under review at Dreamstime in the Management Area by clicking on the Pending Files button.
You will be notified of the results of your file checks via email. The only point is that when the raster version of the vector is checked, you will receive an email stating whether it was accepted or not, while when the vector is checked, the email subject will be “Additional format accepted – ID xxxxx”.
Uploading photos and illustrations via FTP
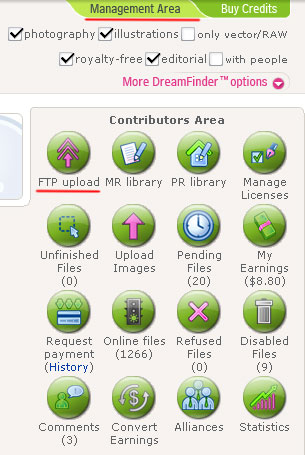
To upload your photos and illustrations to Dreamstime via FTP, you must first activate FTP upload for your account on Dreamstime. To do this, you need to go to the Management Area and in the Contributors Area click the FTP upload button.
On the next page, you will need to click the ACTIVATE FTP button:
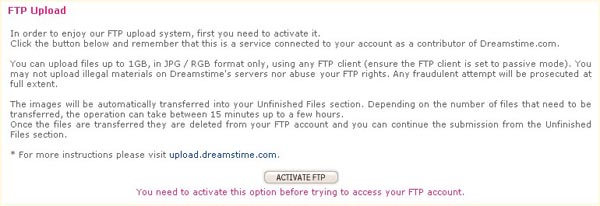
After that, you can set up your FTP client to upload to Dreamstime.com. On the same page, you will be provided with the settings for connecting to the Dreamstime stock agency via FTP:
- Host: upload.dreamstime.com
- User: number, which is displayed on the right side of the Username (user ID) page
- Password: password, which you specified during registration on the Dreamstime stock agency. This is the same password you use to log into your Dreamstime account.
After completing the upload of your works via FTP (remember that for vectors, you should only upload their previews), you need to go to the Management Area tab and click the Unfinished Files button.
Also, note that files uploaded via FTP do not immediately appear in the Unfinished Files tab. Sometimes, you may have to wait around half an hour. Just refresh the page frequently until the number under the Unfinished Files button changes from zero to the number of images you submitted via FTP.
Then, by clicking on the Unfinished Files button, a table with your uploaded files will be displayed.
After that, you can select them with checkboxes and click the Continue button to attribute them and send them for review, as described above.
Dreamstime Interface for Contributor
Newcomers often have questions about how to navigate the Dreamstime interface, such as where to find specific information or perform certain actions. I will briefly outline the tabs in the Dreamstime stock photo agency.
To review the overall statistics of your Dreamstime account, you can always click on Account stats in the upper right corner.
In the Earnings balance tab, you can find out your current balance. Unlike the stock agency Shutterstock, which displays the amount you have earned in the current month, the Dreamstime balance shows the amount currently in your account. If you withdraw this amount, the balance will be reset to zero.
Please remember that the minimum payout at Dreamstime is $100.
The Uploads tab shows the number of works in your portfolio.
Total revenue. Here you can find out your total earnings from the Dreamstime microstock.
Note that Dreamstime does not send email notifications for image sales. Therefore, to see what has been sold, you need to check the Earnings balance tab. This tab provides a table of your sales sorted by date.
In this table, you can click on the column titles to sort the works by different criteria, such as the number of downloads (Downloads), upload date (Uploaded), views (Views), or the earnings each work generated (Earnings).
The Management Area section contains the following useful buttons:
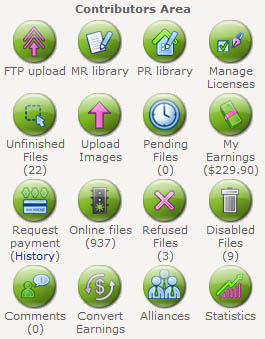
- FTP upload – activate FTP upload.
- MR library – this is where the model release library is located. Here you can upload model releases, edit existing ones, or simply delete them.
- PR library – this provides the property release library.
- Manage Licenses – in this section, you can set prices for selling full rights (Sell the rights).
- Unfinished Files – this displays files not yet submitted for review.
- Upload Images – here you can upload your works to Dreamstime.
- Pending Files – displays files currently under review.
- My Earnings – here you can see the most recently sold images.
- Request payment (History) – in this section, you can create a request to withdraw your earnings from the Dreamstime microstock, provided you meet the minimum amount.
- Online files – here you can view your portfolio.
- Refused Files – this is where all files that were rejected by Dreamstime inspectors are collected.
- Disabled Files – inactive (disabled) files.
- Comments – this section contains comments from others regarding your works.
- Convert Earnings – here you can convert your dollars to credits to purchase others’ works.
- Alliances – alliances and partnerships of Dreamstime.com with other contractors. You can disable the ability for your works to be sold by Dreamstime microstock partners.
- Statistics – this section provides statistics on accepted/rejected works, sales, and your activity in the Dreamstime stock photo agency forum.
Now, I believe you have all the necessary information for your work in the Dreamstime to be successful and fruitful and earn money with photography.
This article is available in the following categories: About Microstocks, Dreamstime


A very cool stock photo site for earning. I recommend it. It is my top earner.
A foreign passport is mandatory for the tax declaration.
No.
Is a foreign passport needed?
Is a passport required for registering a tax declaration?
Valery
Hello, please help me solve the problem. I wanted to withdraw my earned funds that accumulated over a year or two. I needed to upload a new tax form, which I did. Everything was uploaded. But I couldn’t withdraw, all my money somehow moved to CREDITS and now I have to buy my own works? I wrote to support, no response. What should I do?
Good day, most likely you clicked the wrong button when trying to withdraw money. The only way is to write to support explaining the situation. If they don’t respond – write again, spam them. You might try writing not only by email but also on social media.
Thank you for the response. But they are not responding to my requests at all. Not even once. I have written many times. If nothing is bought, how long will this money hang in credits? And where will it go? From this, I conclude that I should delete all my works. Giving them over 300 dollars. Is it possible to later give my works for upload to someone else? A lot of effort is going to waste.
1. Keep writing, you can call, write on forums and social networks, to all of Dreamstime’s addresses. Sooner or later they will respond. Dreamstime’s rules state that it is possible to return money from credits if no more than a month has passed and you have not purchased any images. Your situation is quite special, but the developers of Dreamstime are also to blame for it – I was confused at first too – where is the withdrawal and where is the transfer to credits. The main thing is that you will have confirmation that you contacted them first within a short time.
2. I don’t think you need to delete your works, although that is entirely your decision. But earning +300$ on Dreamstime in a year for a beginner is not bad (though I don’t know the number of works). Plus, lazy earnings are a good thing – you can check once a year and collect your “pennies.” All that’s left is to figure out how to withdraw money correctly) Not through “Convert earnings,” but through “Request payment.”
3. You can give your works for upload to someone else, but through an officially notarized contract for the full transfer of rights to the works. As an option – entering into a contract with an agency that deals with selling works on stock platforms (there are many, but they pay pennies and are always looking for fresh young “meat” for new ideas).
Thank you very much.
Hello, could you please tell me if when sending a photo, a window with hieroglyphs pops up in the line “use for web” and nothing gets sent, what does it mean?
I haven’t faced such a problem, but! Most likely your photo does not meet this license.
Hello! I am a newbie; out of 10 works, 7 were accepted, and three were rejected, requiring proof of copyright. All works are paintings and original. How can I prove my rights? Thank you.
Hello! In the release field, you can upload photos of sketches of your works, if available – this will serve as proof of copyright. If you are drawing from imagination, I recommend taking screenshots at key stages of your work, then combining the screenshots in Photoshop and uploading them to the release field in the same way.
Could you tell me how to connect the wallet? And which option is better? They ask to buy a plan, what is that? I don’t understand how to work with this. Please reply.
Buying a plan means that you want to work with Dreamstime as a buyer. If you want to earn on Dreamstime, then you don’t need to buy a plan. You can specify the wallet for receiving payments when requesting the payout amount on the page https://www.dreamstime.com/request_payment.php. You can choose Skrill, PayPal, or Payoneer. Look for what is more optimal for you in terms of fees, payment options, etc.
Thank you for your response. I deleted it. Where can I now find this support? And another question: if I need to delete more than the limit allows, when can I delete the rest?
You can find support at the very bottom of any page under the “Contact Us” link. In the dropdown menu “Subject”, choose “Other inquiries”, and in the “Comments” field write something like:
Hi!
Please delete my disabled file(s) ID (list the specific ones, preferably in a column).
And I haven’t heard that there are limits on deletions)) Limits on uploads are not important here.
Thank you! I deleted it. Now the question is, where can I find this support? And another question: I want to delete more than the limit allows. When can I delete the rest? Thank you for your attention.
How can I delete an already uploaded work? I can’t find the delete button.
Deleting is not easier than re-uploading! First, you need to go to Online files in the Management area, find the desired file, and in the far-right column of the file’s row, click the Edit button. This will open the image editing window, and here at the bottom, click the Disable button. This will remove the file from being shown to buyers, but it will remain in the database. After that, you need to write to support, providing the File ID, requesting the deletion of the image.
Thank you very much for the response!
Hello. I have a question: it has been 4 days in the status “Image is being reviewed by the inspector.” Is there some kind of failure?
Good afternoon! I apologize for the delay in responding; there were internet issues. On Dreamstime, the review can take up to a week. For your own peace of mind, you can write to support to inquire about such a long review, but essentially, there is nothing to worry about.
Can you please tell me what the caption under the photo title means: 0 d. / 197 v. ?
d – downloads
v – views
I would like to know why I cannot change my profile. I filled out all the positions marked in English, but I cannot save it, even though I specified the path to upload my photo…?!!!
Gennady, I just tried to make changes to my information on Dreamstime and submit it; everything saves fine. Please check, maybe something is not in English somewhere?
Thank you for the response! I will keep trying.
Thank you very much for the answer, but I really drew from my head. And all ten drawings were rejected; they wrote that they cannot accept them categorically, which is basically impossible (I’m translating). What should I prove that these are my own? I just registered on this site, and these surprises came up. I’ve lost all desire to work with them.
I also tried to upload a vector. First, as required, the preview, and then I was going to upload the vector. But for the preview upload, I was told: this is not RGB, and naturally, the upload did not proceed. What should I do?
I will respond in order:
First, because you just started working with this stock, they ask you for the sources. You are new to them, and unfortunately, they are not always honest with stocks, so the stock and its inspectors take precautions against possible risks. There have been many precedents. Therefore, you shouldn’t give up immediately and lower your hands, especially since this stock is more than good. For many stockers, it ranks 2nd to 4th in profitability. In this situation, you can try re-uploading with a note for the inspector that the drawing was drawn by hand on a tablet and from your head, and you plan to upload the vector for it; or try to draw a sketch specifically for it (at least very schematic) and proceed with the earlier described scheme.
Second, usually, Dreamstime specifies the exact reasons for rejection. And indicates whether it can be corrected or not. And how exactly.
Third, when you save as .jpg, do you change the mode from RGB to CMYK? If yes, it could be temporary site issues, connection issues, provider issues—you understand, everything depends on many factors. First, check the color model by opening the work in Photoshop. Then try uploading in different ways (through the website, FTP). Sometimes my works are also not accepted for strange, unnatural, and untrue reasons, but you need to pay more attention to the details and try again. Don’t stop because of one unsuccessful attempt.
Please tell me how to create a release for an illustration if I drew it on a tablet? What should I photograph? And where can I find the form to fill out?
If you drew from your own drawing on a tablet, then put your copyright on it, photograph it, and send it instead of a release. If you drew from your head, then you have nothing to send. In principle, all stocks, except for IS, can accept it even without such a release (it may not be accepted on the first try).
Hello. I have a question: Is it mandatory to upload a scan of my passport?
Good day!
It is not mandatory right away, but to receive a payout you need to upload it…
Thanks, you helped!!!!!!!!
rghost.ru/37153870/image.png
Okay, I noticed several of your mistakes right away.
1. Title – it might be more relevant to name these types of photos something like “beach” or “summer” instead of the country name.
2. Description – you’re using keywords, but here you need an actual description, like “beach umbrellas on an exotic beach by the sea, photo”.
3. Why so few keywords? This isn’t SS or exam submissions, so I’d recommend using at least 20 – it’s crucial for search visibility.
4. Remember, on DT you shouldn’t use keyword phrases, only individual keywords.
5. To boost sales, you can also include the coordinates of the shooting location.
6. You need to press the right “Save” button. I might be wrong, but in the English version, the save button is located there. And I recommend using the English version as well))
Good luck.
I hope my advice helps you.
Everything is checked!!!It’s not working, help, help what should I do? Could it be because I have a USB modem?
Hmm, what does the modem have to do with it? Or is your file not uploading properly?
Ivan, take a screenshot of the screen where everything is checked, and another one after you hit submit when it redirects you. Upload them to an image hosting service, like Radikal or Clip2Net or RGhost, and drop the links in the comments, and I’ll take a look.
Please tell me, I go to completed files, then do everything as needed, well, putting in keywords, checking boxes where necessary, and so on. I click save and it throws me back to the same page, what’s going on?
Check if all the boxes are checked, as something is likely not checked.
Please help! I filled out the tax form on Dreamstime and at the end I needed to upload a passport scan. I indicate its location, click upload… an error appears – and it says to upload your passport. What could this be and how can I resolve it? Thank you.
Check the file size. There might be a limit on the maximum size or allowed extensions.
Thank you! I found it :).
Hello. I received an email from Dreamstime regarding some tax and the opportunity to fill out a form that would exempt me from this tax, as I understand it. However, I didn’t understand where this form is). It seems I missed something). Please tell me where to find this form and how to fill it out.
Good evening, Ksenia!
You can find the form in the Tax Center section. You will need to fill in the required details and upload a scan of your passport.
Can you tell me how to delete my images from the microstock and leave its system? Is there such a mechanism? Please provide links to the relevant pages on DREAMSTIME.COM.
Let’s say my conditions have changed, and I no longer want to place my images on the microstock.
Thank you!
On Dreamstime, you can delete images if at least 6 months have passed since their upload. Look for the Delete button there. If you want to delete them earlier, write to the stock’s support team explaining the reasons for deletion.
Thank you!!!=))
Got it=)) Thanks a lot already!!=)
By the way, what’s the difference between First name and Last name?? (I haven’t filled these fields=))
Is the first one my real name and the second a nickname or something??=))
First name – given name
Last name – family name
Hello again!=)
Could you spare a moment and tell me in which menu on Dreamstime I can update my information??=)
Good afternoon, Victoria!
It’s simple—go to the Management Area, then in the bottom left section, under Account management, choose the pink button with a blue person icon labeled “Edit Profile,” and you’re good to go!
Good luck!
Yes, I mean categories.
Got it, I’ll wait.
Thank you so much for your help)
Good luck, Ksenia!
If you have any questions, feel free to ask!
Also, many people have issues with keywords, so pay more attention to them 🙂
The table appeared on its own =)
But when I uploaded the images and went to Unfinished Files and clicked on one of the images marked COMMERCIAL RF, I got this error: Your image was uploaded but submission did NOT complete.
Please edit account info and fill in all required information in order to be able to upload images.
Once you have provided full account information, you can continue the upload from the Unfinished Files section.
Here’s the approximate translation from an online translator:
Your image was uploaded, but submission did NOT complete.
Please edit account information and fill in all requested information to be able to upload images.
Once you have provided complete account information, you can continue the upload from the Unfinished Files section.
Could you please explain what I should do next?=)
Good afternoon, Victoria!
The issue lies in incomplete user information. Check all the details carefully (many make mistakes with the postal code or phone number). Once you fill in all the required information, you will be able to attribute images.
Good luck!
Can you tell me if there is anything else to do after the files are accepted and listed in the Online Files section?
I can’t seem to find them in the thematic sections…
Thematic sections—do you mean categories?
In general, files need some time to be indexed (up to 3 days). After that, they will appear both in the search and in the categories. Don’t forget to sort them by newest.
Thanks! I’ll try it this evening! =))
Good luck!
Please help!
I registered on this stock photo site and followed the instructions to upload images, but I don’t get the window where the number, file, and size are indicated. I went to java.com, downloaded the program from there, and installed it on my computer. I went back to the stock photo site, tried to upload the image again, but the window is still missing, and it says that this program does not work on my system. What should I do? Please advise! I have already reinstalled this program five times, but the window still doesn’t pop up…=(
Hello, Victoria!
This problem can have several causes.
One of the main ones is browser plugins. The solution is to change it. Simply put, if you were using Internet Explorer, I recommend Mozilla Firefox or Opera, or vice versa.
Then check if Java is properly installed—it’s a bit more complicated, but there are detailed instructions on the Java website.
And finally, the best, most useful, and effective method is to use FTP to transfer your files. You’ll need to install an FTP client, such as Filezilla. Alternatively, you can use built-in FTP, like the one in the Total Commander file manager. Then enter your details in the client settings (they are on your personal page on httр://www.dreamstime.com/ftpupload.php on the right) and upload your files. They’ll be displayed within 2-3 hours 🙂
Good luck and happy sales!
Author, could you please tell me where to write regarding link exchanges (to what email)?
netiq at ua.fm